Showing posts with label christmas. Show all posts

Wednesday, December 25, 2013

Christmas 2013

Christmas was celebrated early this year so that the whole family could get together. We had tons of good food and opened presents on the 21st. It was fun and chaotic as usual! Soon after celebrating though, a 24 hour bug swept through most of the family! We were all sick and totally miserable. Thankfully we were back to normal by the next day... and able to eat other foods besides dry toast and crackers! lol On a much brighter note, I got lots of great stuff for Christmas this year. Thank you, dear family! Take a look at some of my favorites here! Also, enjoy bits and pieces of the dogs who decided to be in the way of photos too... mostly Ginger's limbs. ;)
This huge tote is handmade from a rabbit food bag! The inside has a really cute rabbit print material. It's incredibly cool and I can't wait to bring it to a rabbit show and...well, show it off!

So, I finally get to visit our new Ulta store with this gift card! I also got a gift card for JC Penney and a local pet store. Of course there are some various beauty items here too! I got some eye shadows and lip balms, some neat Avon mosaic nail polishes and my favorite glimmer sticks eyeliners. I also received a few pieces of jewelry and a sparkly bow headband.

My new and ever glorious Mukluks! My mother knows me so well... feathers, tribal pattern, bright neon-like colors. These are the Jasmine Boot Slippers,and they are super cozy and cute!

I am totally digging the Red Wings hat and scarf! Look at that pompom!

 Loki likes to bobble! My stuffy Captain America needed a friend... or enemy...
This adorable little Pop! vinyl Loki bobble head figure just makes me so happy... and look how much bigger he is than Thor. I bet that makes him ecstatic. ;)

I hope you've had a very merry Christmas and best wishes to you in the new year!

Wednesday, November 27, 2013

DIY Christmas Advent Calendar

This year for Christmas I decided to do something really fun for my 6 year old niece! I am usually pretty broke, but just like her birthday, I wanted to leave her with that lasting impression of, "Wow, I have the best aunt"! Hahaha! I shop at Dollar Tree, where everything is $1...or sometimes two for $1! For her birthday I filled a gift bag for only $12. She got 12 different things and her smile got bigger and her voice more excited as the gifts kept coming out of the bag. It was like she was a young Mary Poppins. I wanted to do something similar for Christmas! What better way than an advent calendar? She gets 25+ gifts! I shopped at Dollar Tree and only spent $10 on her gifts. I collected toilet paper and paper towels rolls from our home and my sisters to hold the gifts. I used left over tissue paper, scrapbook paper and the various glues we had lying around. I just so happened to have an old box from a previous gift I had received to be the backing. So I really only spent the $10 on her gifts. :)


I managed to get Christmas puppy and kitten stickers (which I cut out separately so they fit), plastic rings, clay ornaments, Starburst, girly erasers, hair ties, a Doc McStuffins washcloth, a windup walking penguin, a package of temporary tattoos, and then added my diy lip balms and a homemade bracelet.

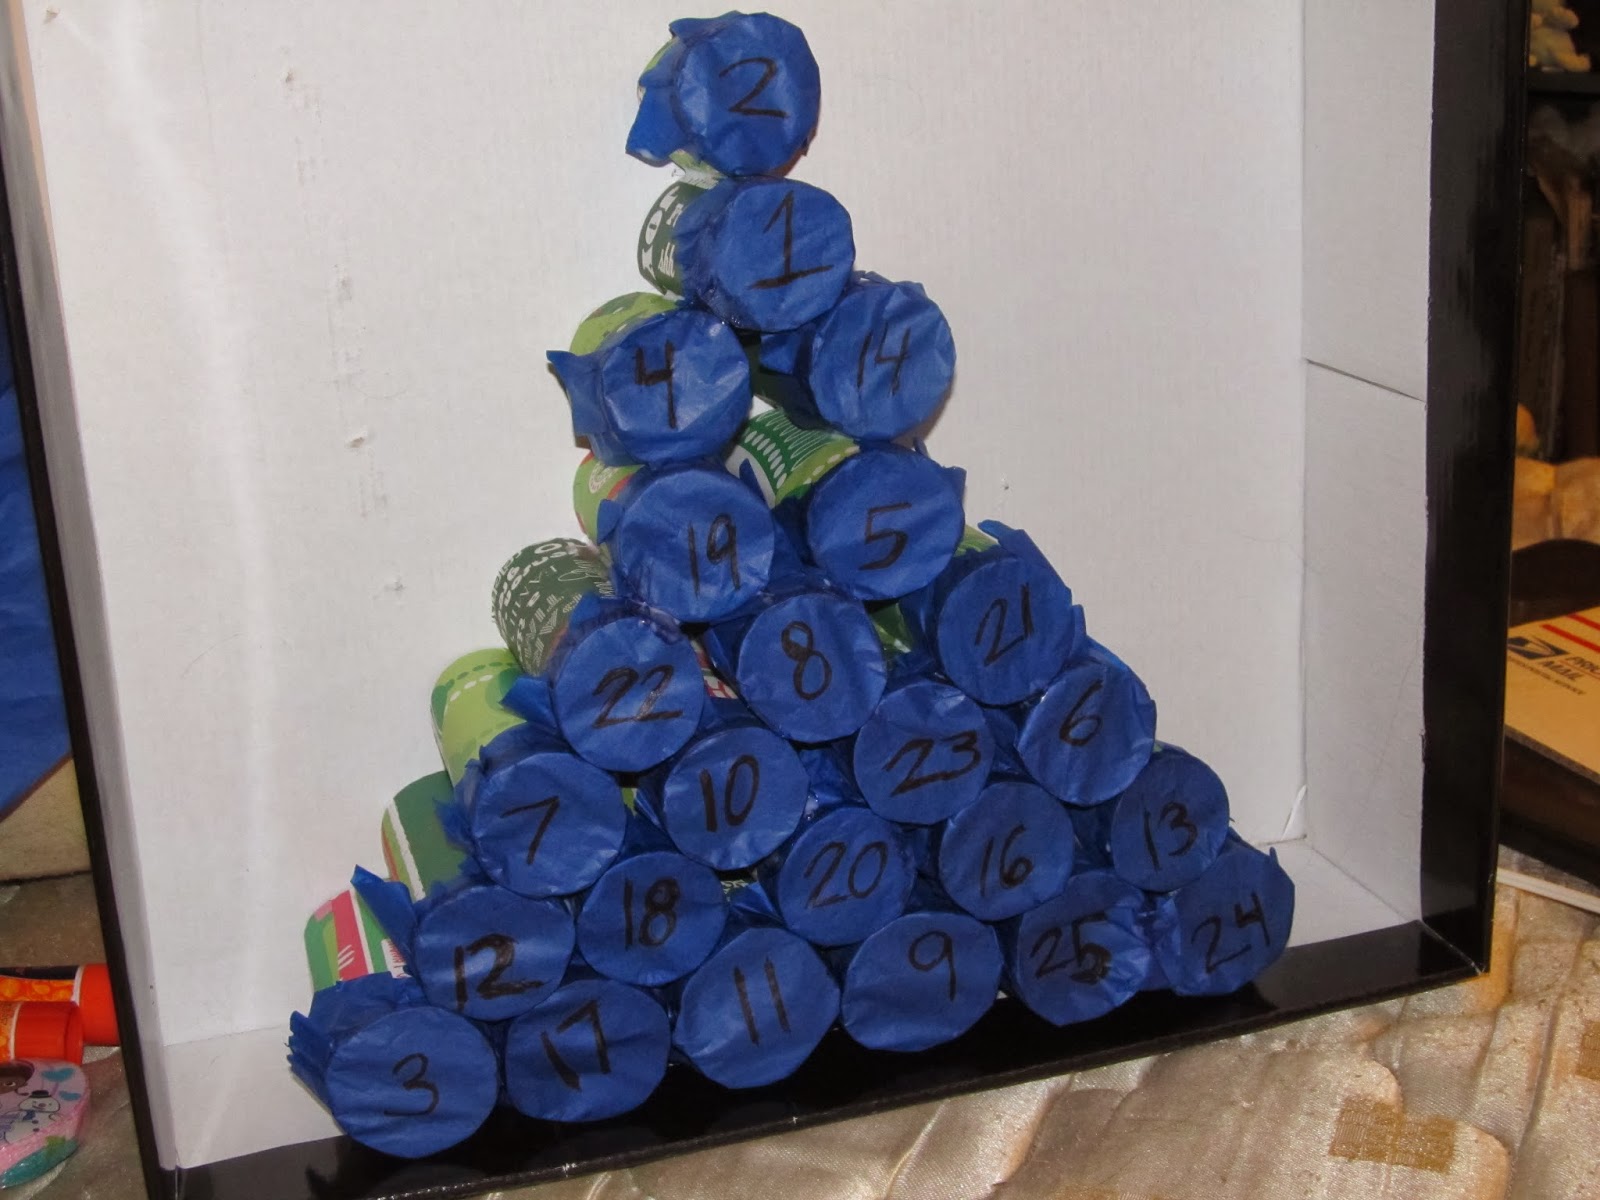
First I collected the paper rolls! I suggest bringing one to the store with you to make sure the gifts fit inside! I forgot to, but still did pretty good! I didn't have enough, so I cut  few to make them shorter. My tree is set up to where the numbers are in a random order. I just made sure that smaller gifts went in the shorter tubes! Other materials I used where Christmas scrapbook paper (to wrap the tubes, used 6 different mostly green patterns), scissors, a pen, yellow card stock (for the star topper), tissue paper (to cover the end of the tubes), a hot glue gun (to glue tubes together),  an extra strength glue stick (to put paper on the tubes), and regular white glue (to secure the tissue paper).

So I cut the scrapbook paper into fourths. Then I covered each piece in the extra strength glue stick and rolled it onto the paper roll. This was the longest step! It took me about an hour. lol You can also just use paint or leave them plain though. After the roll was wrapped, I cut off the excess paper on the ends.


 After all the tubes were wrapped, I started cutting out squares of tissue paper and then adding the numbers to them. At this point I realized that one item did not fit in the tubes! So I left out a number and wrapped the little gift separately so it looked like a gift under the tree. :) To secure the tissue paper to the ends of the tubes, I used a little bit of the regular white glue around the edges of one end and lightly pressed the tissue paper to the glue. I tried my best to keep the numbers centered.

 Once all the tubes were covered, I used the hot glue gun to glue the bottoms/sides together in a Christmas tree shape! When turned around, I could see the numbers through the tissue paper. That made it easier to spread out the gifts evenly so she wouldn't be getting too many of the same kind of gift really close together.

 I stuffed everything in the back and then carefully adhered it to a big box (one side cut off) that I had lying around that another gift came in. lol This way nothing could fall out! I also have seen people just trace and cut a piece of cardboard to fit the back or use felt. :) I glued a cut out star above the tree and then wrote Merry Christmas and decorated with more drawn starts. I taped the separately wrapped washcloth to the base of the box to look like a present under the tree. This tree took me about 3 hours to complete!

 I pinned lots of ideas on Pinterest!
Here are some other cool ideas that I found that also helped to inspire me when I planned on this project!

[3] Grains of Earth (this one has several great projects!)