Showing posts with label budget. Show all posts

Saturday, December 27, 2014

Watercolor Haul

Alas! I have a new camera! Special thanks to my parental units for getting me a new camera for Christmas after my outdated one decided it didn't want to function properly. I am beyond happy. I really missed taking pictures!

My boss got me a Hobby Lobby gift card for Christmas, so I went straight away to pick up some new watercolor supplies! I would have preferred the better quality paints, but I didn't want to spend a fortune. I decided since I am no professional, I am going to try "The Fine Touch" brand from Hobby Lobby. I also picked up some brushes, paper pads, a little sealable pallet and a waterproof ink pen. Get closeups and more info below! :)

I got a cheap set of $5.99 round camel brushes in the sizes 2, 4, 6, 8, 10 and 12. (The Fine Touch)
I also got a $7.99 with a size 2 liner and rounds in the sizes 8, 16 and 24. (Master's Touch)
My little plastic folding palette was $2.99. (Master's Touch)
I picked up a $3.99 Pitt Artist Pen too. I got the 0.6 mm fine tip with black India ink. (Faber-Castell)


Next, my cheap paints! lol I got this $13.99 set of 24 tube watercolor paints. (The Fine Touch)
I will have some color swatches below! You can also see them in my palette.
I got 6x8 and 9x12 paper books too.


Here is what the palette looks like when it's open. There are 20 paint wells and then 5 other areas to mix colors. There are also little brushes holders and a place to place your thumb. Pretty decent for the price. It will work for now! I squeezed in my paints and will wait for them to dry. They can be activated again with water. :)


 Here are some quick color swatches of the paints. I got most of them here. I think there was one blue and then the gray and black that didn't fit into my palette. I might end up scraping out a red or two later to make room for those though. A few of the reds look quite similar. I didn't use a whole lot of paint and there is still plenty, so it won't be much of a loss. :)

All together I spent about $30 on everything. I used a 40% off coupon on my paints!

I will share some of my little paintings soon. :)
I'm glad to have the always important camera back so I can start sharing again. See you soon!

Wednesday, February 12, 2014

Thrift Shopping Haul

I am pushing my Wreck This Journal post until tomorrow! Today I am posting the things I bought while thrift shopping today. I got my usual small hoard of books and some clothes today! I only spent a little over $10 on everything. :) I can always count on the local Salvation Army. It is probably my favorite place to shop nowadays. Also, for some reason everything I bought today was green!


This green dress by Blair is from who knows what decade. lol I didn't have a dress like this in my closet yet. I love the color and the three small buttons on the shoulder! It used to have some type of belt around it. I noticed a thin loop on the waist area. No worries, I can find another!


 Another teal/green dress, this one is made by Merona. It's light and flowy with a high, stretchy waistband... yay for the slimming effect! ;) This one is so comfy! Can't wait until warmer weather. I have so many new dresses to wear from previous SA trips!


While walking toward the dressing room, the horses on this button up sleeveless shirt caught my eye. I had to do it. It was only a little over $2 and on top of that, the tag color was 50% off today! Couldn't pass it up. I love riding horses and this will be great to wear over a tank top or something in the summer time. :) Pretty prancing ponies!


 Here is my book hoard from today! I've made a list of the titles and authors of each one. I filled a bag of books for the lovely low price of $1.99 today. I love this place. I do, I do, I dooooo! I added Goodreads links to the books that were available. :)


Projection - by Risa Green
The Probable Future - by Alice Hoffman
Persuasion - by  Jane Austen
Her Secret Star - by Bennie C. Hall

A Kid's EcoJournal Set (missing summer, sadly) - by Toni Albert
Conejos/Rabbits (Spanish to English) - by Ottenheimer Publishers
Little Rabbit's Loose Tooth - by Lucy Bate & Illustrated by Diane DeGroat

The last little bunny item isn't really a book... it has a cut out on the front and you open the rest of it to see the bunny family. There are 4 square pictures of the baby bunny on the back. Not sure where it came from! lol There was a turtle one too, but I am the bunny lady. ;)

Tuesday, February 4, 2014

Maybelline Dream Smooth Mousse Review

Here is one of those reviews I promised! I bought the Dream Smooth Mousse foundation by Maybelline at Ulta around Christmas time. I don't usually use a foundation because I knew how hard it can be to find the right one! lol With winter in full swing though, I also knew that my skin was probably going to start looking terrible. I couldn't have that this year! So I try to do lots of moisturizing and such to keep the dry flakes away. It doesn't help at all that I also have oily spots too though. I did a lot of internet research to try to find the best drug store foundation I could that I thought would work for my skin. I quite like this one after trying it a few times. You should be able to find this under $10 at places like Walmart, Walgreens, Ulta, etc. Foundations can be hard to review... everyone's skin is different and we all have our preferences too!

Before applying my face makeup, I always use moisturizer and a face primer. I'd say this is a medium coverage foundation. I will also say that a little can go a long way. I use my Real Techniques buffing brush to apply this. I just dab it a couple times in the foundation and then dot that lightly on some various spots on half of my face. Then I start to buff away. I'll repeat the same process on the other side of my face and then again on my neck. You really don't need a lot of this product to see it work. It goes on very easily and smooth. The texture is super creamy and it blends out very well. I had a terrible skin day this morning... super red and splotchy! This covered it up great and I liked the way my skin looked. It did a good job of covering the redness and hiding my large pores. I put a mattifying powder on my t-zone just to make sure that I wouldn't be getting oily.

I think this is a good foundation for people with dry skin in the winter season. To me, it feels pretty light on my skin too. It has decent lasting power. I think the shade selection could be a lot better. There really isn't that many to choose from. I settled on Nude Beige. I do feel like it comes off a bit... yellow? As I said before, it covered up the redness of my skin and helped to hide the large pores. It really did create a near flawless looking finish for me. I don't think I would use the sponge to apply the foundation. I feel like it would probably go on too thick. You might want to test a few methods and see what works best for you! This foundation seems perfect for me and I will probably be repurchasing it. I might try a shade lighter just to see how much of a difference it makes.  I give you a 5 out of 5, Dream Smooth Mousse! Even if you are more of a cream than a mousse. lol

Wednesday, January 22, 2014

Freeman Charcoal & Black Sugar Mask

This is another review of a Freeman Beauty mask! I've also posted about the Freeman Avocado & Oatmeal Clay Mask and the Queen Helene's Mint Julep Clay Masque. Check them out too! This is the Charcoal & Black Sugar Facial Polishing Mask. I've only ever used clay masks before, so I thought this could be a bit interesting! The big tube (6 oz) is priced at only $3.99 and the smaller packages (.5 oz) were $1.37 each at Walmart, but $1.99 on their website. And again, I have combination dry/oily skin which can be slightly sensative since I am fair skinned. :)

On the package: Polution…debris…it's a wonder skin can breathe! This unique mask and scrub works double time to detox skin. First, naturally purifying Activated Charcoal helps absorb oil and impurities without over-drying. The, Black Sugar helps exfoliate away dulling skin cells for softness and clarity. Perfect for all skin types.

Directions: Apply mask to face and neck, avoiding contact with eyes. Leave on for 5 to 7 minutes. Rinse with warm water. Gently massage for 1 to 2 minutes and rinse with warm water.


Unlike with my clay masks that I use a brush to apply, I used my hands for this one. It was kind of difficult to spread around since obviously the texture isn't smooth, but grainy from the sugar! lol The smell was quite nice though. As you can see in the pictures below, it goes on quite chunky. Also unlike the clay masks I've used, you only leave this one on 5 to 7 minutes instead of the 15 to 20 minutes. You can see that under the mask my skin is a bit red... that is because this mask heated up my skin! I wasn't really expecting, but it wasn't unbearable. If you have really sensitive skin, this might not be for you. I can have sensitivity to some skin care products being a strawberry blonde with fairer skin. It was a little uncomfortable, but I waited it out and I liked the results I got in the end. :)


In these next pictures you can see what happens after you massage the sugar scrub for a couple minutes. I added a bit of water to my hands to make it easier to move the scrub around since it had dried a bit. Then I removed the mask with warm water over my sink. Once I rinsed, I was very happy. lol My skin felt so soft and clean! I didn't even have to put on moisturizer like I usually do with the clay masks. I felt the wonderful effects for days and I'll be glad to do this one again!

If you ever feel like your skin needs a deep clean and you don't mind a mask that heats up, this could be a great and very cheap option for you. I think it was a pretty interesting, but good experience for my first non-clay mask! My next mask is a paper one which I have never tried before either. lol That should be interesting too. After that, I think I will make a trip back to Walmart so I can try a few more. :)

Thursday, December 5, 2013

Staying Organized: Bathroom Edition

I love to organize things! I am big on finding storage containers and organizing things by size/shape or type of item. I have so much make up, hair accessories, jewelry and nail products that it's easy to clutter up my small bathroom. I made my dad install a large shelf to hang over the toilet so that I could put things away! You will soon see why I definitely needed it! Keeping things organized makes getting ready to face the day much easier. Perhaps this post will give you some ideas on how you can keep your bathroom a little more organized! While you are out holiday shopping, keep an eye out for neat ways to organize the spaces in your house. :)

Figure one. The life saving cabinet. As you can see, it's pretty full! Before this bad boy was attached to the wall, most of this stuff was shoved into a drawer in my vanity! It was nearly impossible to find anything and it looked terrible. We purchased this at Home Depot. I want to say this one was around $100. We had the option of some cheaper ones, but this one matched the new vanity we had installed a year prior. There were a few options between $60 and $80 too. To better organize some of the things inside, I have a little white plastic container bought from Dollar Tree. I also have some pop-up paper organizers that I bought very cheap on Ebay. I believe they came from Korea. I am looking for a better method now though! My lip products and mascara and eyeliner collections have tripled in size since I bought them. They are bursting at the seams. lol So, in this cabinet we have some various things at the top. It's kind of the miscellaneous shelf. There are cotton balls and makeup sponges, my collection of face masks, my moisturizers and lotions, nail polish remover and my makeup remover wipes. In the middle shelf, I have some bigger eyeshadow palettes and the plastic container is full of smaller palletes that I don't use as often. I'll get to where I put the other ones soon. ;) There are also a few single shadows there as well. In the bottom shelf that is left exposed after the doors are closed, I have my small fragrance collection, my eyeliners and mascaras in the first paper organizer and then my lipsticks and glosses in the second one. On the far right there are some things that don't fit anywhere either. Some lip products, a couple powders and false lashes.

Moving down and onto the vanity, I have this little organizer with drawers. I stole it from the craft room! It used to have pens and markers inside. I thought it was better suited to hold my makeup. lol After this picture was taken I added a few more things, but I'll explain. :) At the top I have my primers, concealers and my go to eyeliner pencil. I also have a foundation and BB cream there. My eyelash curler is always on the far right and and ready to go too! In the area under the pop up lid, I put the powders I use most often. There is also a tiny blush there now. The first drawer is where I keep all of my brushes! In the second drawer I have all of the small eyeshadow palettes that I use most often. There are 6 small palettes inside there at the moment... I was surprised how much I could fit into this little drawer! In the last drawer I have my collection of cream shadow pencils and pots. After the picture was taken, I added 3 different bronzers on one side. They still all fit in there rather nicely. We are just going to ignore the bracelet and the triple antibiotic cream I left on top. That is no way to stay organized! I love this little drawer container because it fit perfectly on the edge of the vanity. It's right there when I need everything. Very little hassle when I am looking for things.

Over to the medicine cabinet! I don't own very many hair styling products or meds... or else there might be more to look at. lol At the bottom I have my hairspray, mousse, pot of q-tips and the mouth wash has been swapped out for a dry shampoo. The next one up has a random collection of things, like an anti-frizz hair cream, band-aids, and floss! Up top is an old kabuki and powder foundation that don't have a place among my other makeup. lol On the knob, I hang some necklaces and headbands that I don't want to get tangled up in where they usually are stored. This is probably the least interesting part of my bathroom... This area doesn't seem to have any sort of direction.

On the back of my door is this neat jewelry organizer that I bought for $8 at Big Lots. It has 12 small open pockets at the top and 3 long zipper pockets at the bottom. This is where I put most of my "costume" jewelry. If I didn't have this... I have no idea where all of this would be right now. It scares me to think about it!! I store many different bracelets and rings in the top pockets and then long necklaces in the bottom ones. I also hang some of my sunglasses off the top. They are much better protected here. I've had the dogs eat them before. lol

This little earring tree is now located safely on top of the dresser in my closet. I can't tell you how many times it has been knocked over onto the floor or into the sink. If only I had more space on my vanity. At least the poor thing is safe now! I really do enjoy it though. It keeps all my earrings in clear view. I also like that I can put things in the little dish at the base of the tree. My mom bought this for me as a gift for Christmas a few years back. I believe it was around $10 at Family Dollar. :)

Top drawer of the vanity! This is where all of my hair accessories live. There are two more of the plastic Dollar Tree containers in here. I have hair ties in the bottom one and then some of my hair clips/barrettes in the top one. The rest of the space is occupied by my many headbands and hair bows! This drawer can be hard to keep organized. The headbands can be a pain! I'm not sure I have any other way to store them at the moment, but Pinterest is always full of creative ideas.

The bottom vanity drawer is where all of my nail products go. Two more Dollar Tree plastic containers hold my mini and standard sized polishes, as well as my detail brushes and other little nail accessories. My clippers, files and all that jazz are here too. :) Right now I have so many polishes that they don't fit inside the container anymore. Something else I have to work on... bigger container! lol I like just pulling them right out of the drawer and sorting through to pick my colors. I can bring them up onto the counter and see them better in the light. Plus I won't have to be hurting my back by bending over and trying to dig into the drawer.

Last, but not least... under the sink. I have a huge makeup palette, travel makeup bags, bath stuff, a nail dryer, hair dryer, flat iron... all the big stuff I don't want to look at on a daily basis! There isn't a whole lot of room, so I added a little basket at the bottom to better organize the small things. I have some bath salts, spare razors and similar things there. The bigger things are stacked as nicely as possible. My hair styling tools are located in the back right corner. There is a taller cube container from the Dollar Tree that they sit inside of. That keep the cords from getting tangled and them from getting lost in there!

Well, I hope that this might have given you an idea or two on how you can make a small space hold a lot more stuff than it is supposed to. ;) So far, this system is working quite nicely for me. Someday soon I will have to revamp the shelf where my lip products and mascaras are... they are slowly taking over! I'll be on the look out for more cheap containers! I always check at places like Dollar Tree, Dollar General, Family Dollar and Big Lots. I can usually find the best deals there. If not those places, Walmart or Meijer will be there to back me up. I also like to shop around and then look for deals on Ebay. That can sometimes be your best bet. :) Take care and enjoy your holiday shopping! I hope everyone had a blessed Thanksgiving!

Wednesday, November 27, 2013

DIY Christmas Advent Calendar

This year for Christmas I decided to do something really fun for my 6 year old niece! I am usually pretty broke, but just like her birthday, I wanted to leave her with that lasting impression of, "Wow, I have the best aunt"! Hahaha! I shop at Dollar Tree, where everything is $1...or sometimes two for $1! For her birthday I filled a gift bag for only $12. She got 12 different things and her smile got bigger and her voice more excited as the gifts kept coming out of the bag. It was like she was a young Mary Poppins. I wanted to do something similar for Christmas! What better way than an advent calendar? She gets 25+ gifts! I shopped at Dollar Tree and only spent $10 on her gifts. I collected toilet paper and paper towels rolls from our home and my sisters to hold the gifts. I used left over tissue paper, scrapbook paper and the various glues we had lying around. I just so happened to have an old box from a previous gift I had received to be the backing. So I really only spent the $10 on her gifts. :)


I managed to get Christmas puppy and kitten stickers (which I cut out separately so they fit), plastic rings, clay ornaments, Starburst, girly erasers, hair ties, a Doc McStuffins washcloth, a windup walking penguin, a package of temporary tattoos, and then added my diy lip balms and a homemade bracelet.

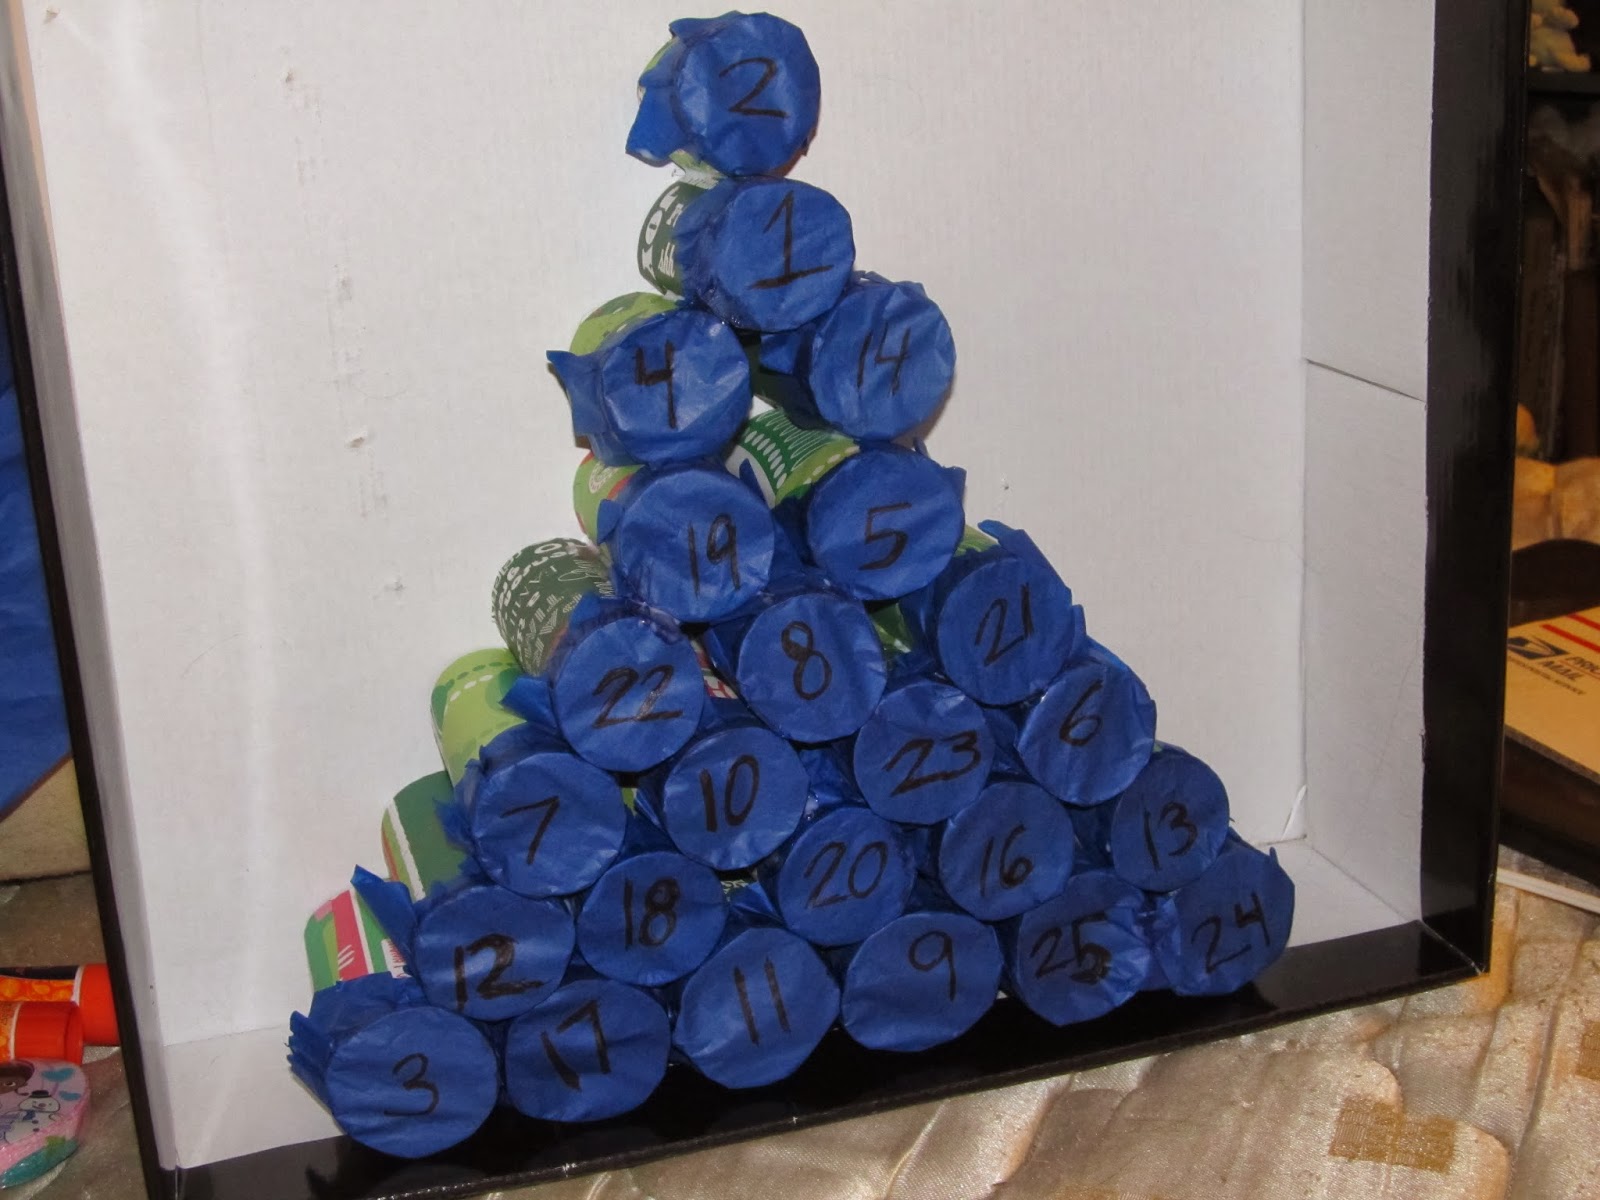
First I collected the paper rolls! I suggest bringing one to the store with you to make sure the gifts fit inside! I forgot to, but still did pretty good! I didn't have enough, so I cut  few to make them shorter. My tree is set up to where the numbers are in a random order. I just made sure that smaller gifts went in the shorter tubes! Other materials I used where Christmas scrapbook paper (to wrap the tubes, used 6 different mostly green patterns), scissors, a pen, yellow card stock (for the star topper), tissue paper (to cover the end of the tubes), a hot glue gun (to glue tubes together),  an extra strength glue stick (to put paper on the tubes), and regular white glue (to secure the tissue paper).

So I cut the scrapbook paper into fourths. Then I covered each piece in the extra strength glue stick and rolled it onto the paper roll. This was the longest step! It took me about an hour. lol You can also just use paint or leave them plain though. After the roll was wrapped, I cut off the excess paper on the ends.


 After all the tubes were wrapped, I started cutting out squares of tissue paper and then adding the numbers to them. At this point I realized that one item did not fit in the tubes! So I left out a number and wrapped the little gift separately so it looked like a gift under the tree. :) To secure the tissue paper to the ends of the tubes, I used a little bit of the regular white glue around the edges of one end and lightly pressed the tissue paper to the glue. I tried my best to keep the numbers centered.

 Once all the tubes were covered, I used the hot glue gun to glue the bottoms/sides together in a Christmas tree shape! When turned around, I could see the numbers through the tissue paper. That made it easier to spread out the gifts evenly so she wouldn't be getting too many of the same kind of gift really close together.

 I stuffed everything in the back and then carefully adhered it to a big box (one side cut off) that I had lying around that another gift came in. lol This way nothing could fall out! I also have seen people just trace and cut a piece of cardboard to fit the back or use felt. :) I glued a cut out star above the tree and then wrote Merry Christmas and decorated with more drawn starts. I taped the separately wrapped washcloth to the base of the box to look like a present under the tree. This tree took me about 3 hours to complete!

 I pinned lots of ideas on Pinterest!
Here are some other cool ideas that I found that also helped to inspire me when I planned on this project!

[3] Grains of Earth (this one has several great projects!)