Wednesday, November 27, 2013

DIY Christmas Advent Calendar

This year for Christmas I decided to do something really fun for my 6 year old niece! I am usually pretty broke, but just like her birthday, I wanted to leave her with that lasting impression of, "Wow, I have the best aunt"! Hahaha! I shop at Dollar Tree, where everything is $1...or sometimes two for $1! For her birthday I filled a gift bag for only $12. She got 12 different things and her smile got bigger and her voice more excited as the gifts kept coming out of the bag. It was like she was a young Mary Poppins. I wanted to do something similar for Christmas! What better way than an advent calendar? She gets 25+ gifts! I shopped at Dollar Tree and only spent $10 on her gifts. I collected toilet paper and paper towels rolls from our home and my sisters to hold the gifts. I used left over tissue paper, scrapbook paper and the various glues we had lying around. I just so happened to have an old box from a previous gift I had received to be the backing. So I really only spent the $10 on her gifts. :)


I managed to get Christmas puppy and kitten stickers (which I cut out separately so they fit), plastic rings, clay ornaments, Starburst, girly erasers, hair ties, a Doc McStuffins washcloth, a windup walking penguin, a package of temporary tattoos, and then added my diy lip balms and a homemade bracelet.

First I collected the paper rolls! I suggest bringing one to the store with you to make sure the gifts fit inside! I forgot to, but still did pretty good! I didn't have enough, so I cut  few to make them shorter. My tree is set up to where the numbers are in a random order. I just made sure that smaller gifts went in the shorter tubes! Other materials I used where Christmas scrapbook paper (to wrap the tubes, used 6 different mostly green patterns), scissors, a pen, yellow card stock (for the star topper), tissue paper (to cover the end of the tubes), a hot glue gun (to glue tubes together),  an extra strength glue stick (to put paper on the tubes), and regular white glue (to secure the tissue paper).

So I cut the scrapbook paper into fourths. Then I covered each piece in the extra strength glue stick and rolled it onto the paper roll. This was the longest step! It took me about an hour. lol You can also just use paint or leave them plain though. After the roll was wrapped, I cut off the excess paper on the ends.


 After all the tubes were wrapped, I started cutting out squares of tissue paper and then adding the numbers to them. At this point I realized that one item did not fit in the tubes! So I left out a number and wrapped the little gift separately so it looked like a gift under the tree. :) To secure the tissue paper to the ends of the tubes, I used a little bit of the regular white glue around the edges of one end and lightly pressed the tissue paper to the glue. I tried my best to keep the numbers centered.

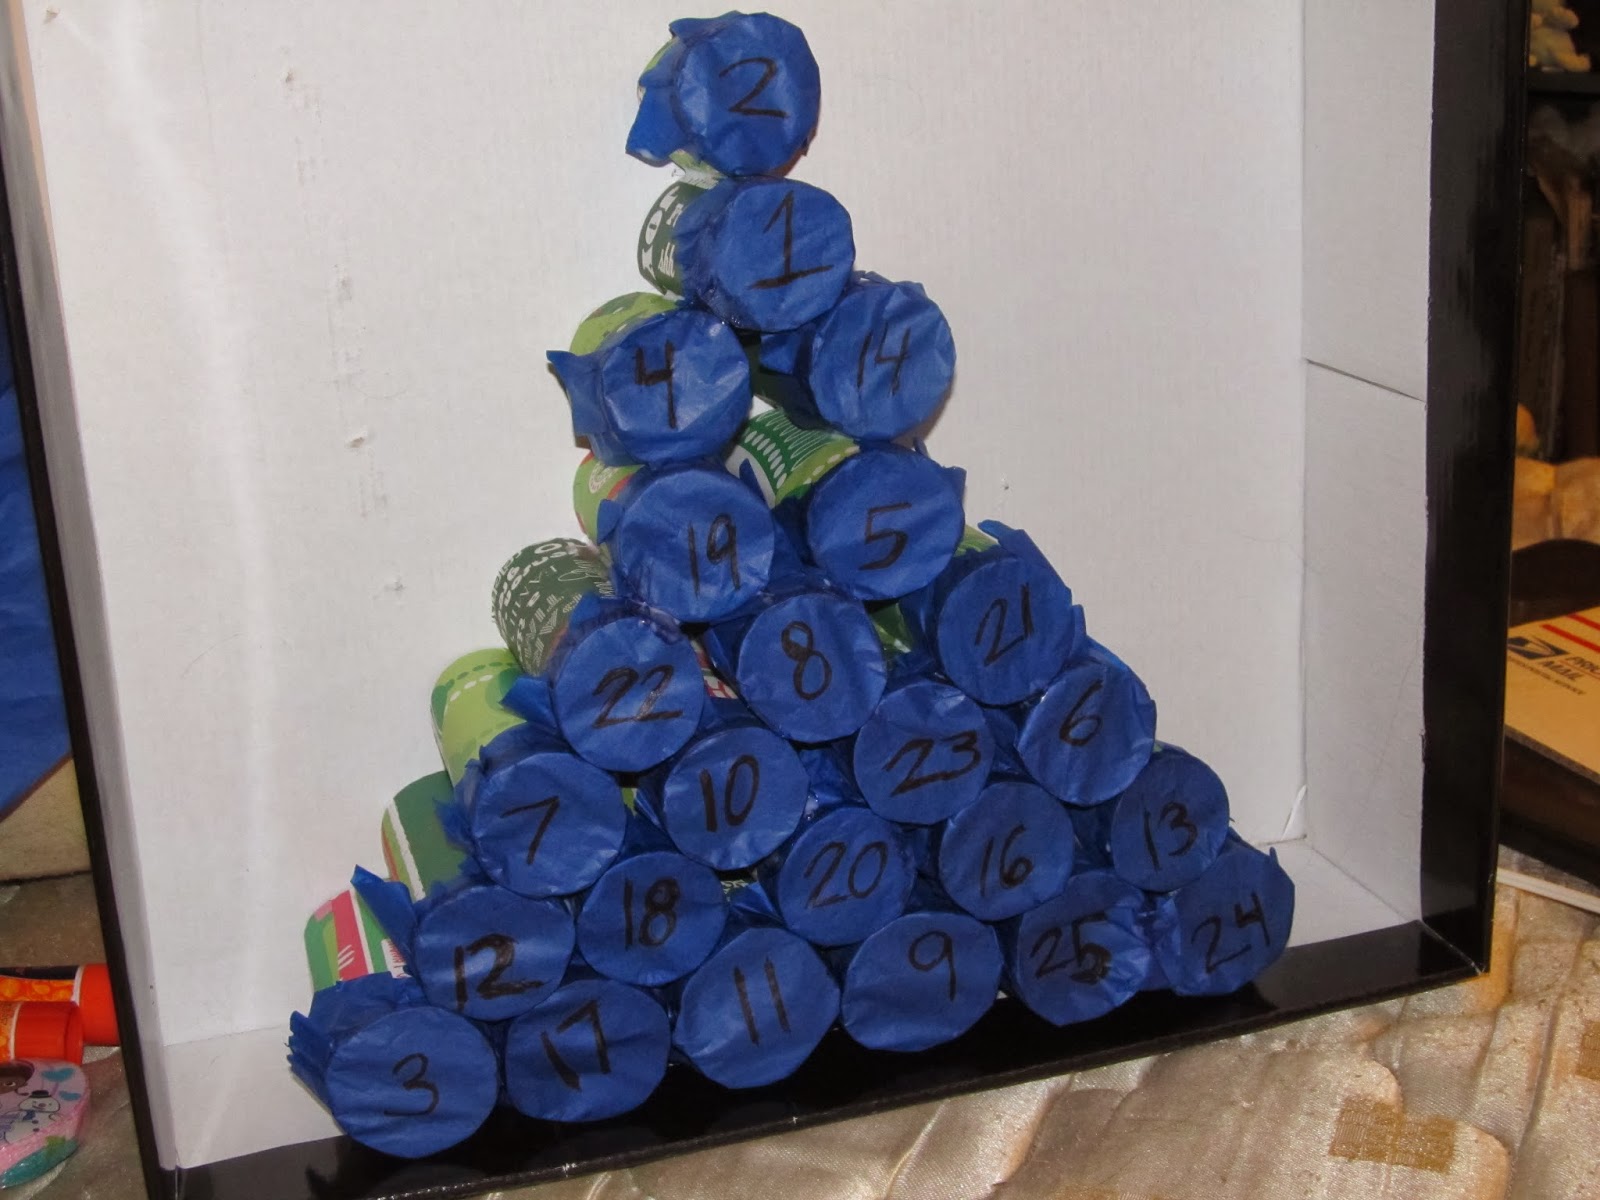
 Once all the tubes were covered, I used the hot glue gun to glue the bottoms/sides together in a Christmas tree shape! When turned around, I could see the numbers through the tissue paper. That made it easier to spread out the gifts evenly so she wouldn't be getting too many of the same kind of gift really close together.

 I stuffed everything in the back and then carefully adhered it to a big box (one side cut off) that I had lying around that another gift came in. lol This way nothing could fall out! I also have seen people just trace and cut a piece of cardboard to fit the back or use felt. :) I glued a cut out star above the tree and then wrote Merry Christmas and decorated with more drawn starts. I taped the separately wrapped washcloth to the base of the box to look like a present under the tree. This tree took me about 3 hours to complete!

 I pinned lots of ideas on Pinterest!
Here are some other cool ideas that I found that also helped to inspire me when I planned on this project!

[3] Grains of Earth (this one has several great projects!)

Thursday, November 21, 2013

DIY Flavored Lip Balms & Crayon Lip Color

I've seen the videos before, but I finally decided to try it. I made lip colors with Crayola crayons! It was very cool and super easy to do. I looked for a very simple recipe and found one with only 2 ingredients; crayons and coconut oil! I used the video below from Madisradd to help me out with the process. :) There are other videos out there and you can add other ingredients as well. Go take a look on YouTube! I also made some easy flavored lip balms too. I've got a base mixture that is easy to melt and add too. I decided to do this mostly because it looked really interesting, but also because Christmas is coming up and I thought my 6 year old niece would get a kick out of the idea that I made some of these from crayons. lol I am making her an advent calendar this year. I will be doing a post on that soon too! :) I thought she would love receiving these as some of her little gifts.


First thing... you need a container!
I emptied out old and/or cheap makeup that I didn't use anymore. I was left with some great little jars and also eye shadow palettes. You can also buy containers in many online stores or craft stores! I will probably have a post up later about reusing old containers and how to clean them for use in "depoting" other products. :)


Next I got some of the things I needed according to the video. A pot and small glass container to melt my ingredients, measuring spoons and a stirring stick. Of course, don't forget your crayons! I also have a lip balm base (white jar with pink lid) and decide to make some flavored lip balms. The base is from Elements Bath and Body. To add color and shimmer to those lip balms, I sometimes use lipsticks (or in this case a cream blush stick) or eye shadows. The base is ready to add to and easy to melt.


To make the balms with the base from EBB, I also use candy flavorings and this pipette to put the mixture into the containers. :) The flavoring oils are very cheap and I bought them at Walgreens. There was a pretty big flavor selection. I have things like peppermint, watermelon, tangerine, mango, strawberry and banana cream. As a note, make sure not to get the melted base too hot before adding an oil. It makes it separate and not mix very well. You might see little bubbles of flavor oil.

 
My finished products! At the top is 4 different crayon lip colors. The swatches are below. The colors ended up being pretty buildable. I found that the blue was very soft. Perhaps from having too much coconut oil and not enough wax? I filled two tiny jars with the coral and light purple colors to add to my niece's advent calendar (one is at bottom right). I made the dark purple with crayons for myself. All of these obviously smell like coconut. The other lip balms in the center and to the right are made from the meltable base from EBB. The dark pink has the cream blush added to it for color and a little bit of hot pink eye shadow to make it shimmery. I added blueberry and pomegranate flavor oil too it. The lighter color just had a light pink eye shadow that added a little color and shimmer. I added butterscotch flavor to that one! It's brown, so it changed the color slightly.


Monday, November 18, 2013

Photography - Tuli

Out of boredom today, I went out with Tuli to take some photos. :) Tuli is my almost 4 year old black tri Miniature Australian Shepherd. She has been doing much better at coming when she's called, so I decided to let her go off leash in the yard. She did pretty well! lol Her little brother on the other hand... I wouldn't trust him. Maybe another day! I don't have a good photo editing program right now, but I tried my best with what I do have.


Thursday, November 14, 2013

November 2013 Ipsy Glam Bag & Look

If you have never heard of Ipsy, check out their website to learn more!
This is my first ever Glam Bag and I quite like it. I wish I could continue with my subscription, but money is tight. I just wanted to try it once, at least! lol Take a look at everything I got in my bag this month, with swatches and more info. I also created a look with all the products from the bag. :)

The Products


The bag this month is metallic gold snakeskin with a pink zipper and little wrist strap!

1. PIXI BEAUTY- Bronzer - Subtly Suntouched
2. EM MICHELLE PHAN - Lash Gallery Mascara - Dramatic Volume
3. BH COSMETICS - Galaxy Chic Baked Eyeshadow Sample - Neptune
4. NAILTINI - Straight Up Color Nail Lacquer - Champagne
5. BE A BOMBSHELL - Lip Crayon - Shameless
6. STARLOOKS - Gem Eye Pencil - Topaz

Color Swatches & Information

1. PIXI BEAUTY- Bronzer - Subtly Suntouched
"This bronzing powder gives your complexion the warmth and luminosity of naturally sunkissed skin. Hydrating, silky-smooth & long-wearing, it also protects against free radicals. Contains Vitamin E to protect the skin and mica, which provides dense natural pigment."

I didn't get a picture of this since it matched my skin and you could barely see it. It has some very subtle shimmer and I think it is best used on the days where you are going for the look of minimal makeup. lol It could be used as a highlighter on someone with skin darker than my own though. Unless you have porcelain white skin, I don't think it would be much of a "bronzer". I suppose it could even be used as an eyeshadow too.

- - - - - - - - - - - - - - - - - - - -

2. EM MICHELLE PHAN - Lash Gallery Mascara - Dramatic Volume
 "Inspired by the girl who wants to rock out with her lashes. Amp it up and create instant lash drama with a single coat. Uniquely-designed spoon brush 'cup' and quickly builds lashes with rich color and volume."

The formula is very wet, as I assume all or most volumizing mascaras are. It smells like flowers... not like a lotion or perfume flower smell, but like walking through a flower garden. lol I have pretty average looking lashes to begin with... nothing fancy about them. So in my opinion, this was a decent mascara. I think my lashes definitely look more voluminous and dramatic. It's hard to get used to such a wet mascara! I haven't used many like this, so I can't compare it to others, sadly. 

- - - - - - - - - - - - - - - - - - - -

 3. BH COSMETICS - Galaxy Chic Baked Eyeshadow Sample - Neptune
"This Galaxy Chic Baked Eyeshadow Sample will take you from Plain Jane to an infinite trendsetter. Inspired by the moons and planets of the universe, eyeshadow shades range from hot sun-orange to cool earth-blue and colors of the Milky Way. Be as chic as a sparkling star!"

Neptune is a bright shimmery blue color. This is a baked eyeshadow. Some people get put off by colors like this, but if you use it right, you can make beautiful eye looks. The shadow is very pigmented, blendable and buildable. The actual Galaxy Chic palette has some very neat colors in it, if you want to check it out. I was hoping to get the color Asteroid, but this is a nice color too.

- - - - - - - - - - - - - - - - - - - -

 4. NAILTINI - Straight Up Color Nail Lacquer - Champagne
"Just one of Nailtini's top-shelf, 3-free nail lacquer, available in dozens of shades, textures and finishes. Wear them alone or layered to create custom looks and effects, each one a cocktail unto itself. Cheers to beauty, and as always, apply responsibly!"

This is such an interesting shade. I really like it too. When looking at the bottle a few things come to mind... copper, pink, gold. They seem to be all swirled into one. It does resemble champagne as well, in my opinion. lol I just recently painted my nails, so I put it on top of the very dark plum color that was already a few days old. It covered it very nicely. I only used two coats. Didn't have to try hard at all. :)

- - - - - - - - - - - - - - - - - - - -

 5. BE A BOMBSHELL - Lip Crayon - Shameless
"A glossy lip crayon with a smooth texture that is perfect for travel and touch-ups on the go. Apply to top and bottom lips for full coverage. For sheer coverage, apply to lower lip only and blot lips together. For more color, apply several coats until you receive desired results."

The swatch is on the same hand as the eyeliner, so it will be down a little further! Anyway, I really like this color! It's a pretty berry color... I'm going to go with "raspberry". I like this a lot and I think it's a great color to wear for fall too. It goes on really smooth and pigmented. It's also shimmery, which I love in a lip product. lol The description on the site says, 'a burgundy with shimmer' as the color description.

- - - - - - - - - - - - - - - - - - - -

6. STARLOOKS - Gem Eye Pencil - Topaz
"The Starlooks Gem Eye Pencils provide a magnificent metallic finish and are so versatile, soft, and creamy that they can be used as a liner or eyeshadow base! Each highly-pigmented, unique pencil has a gorgeous, micro-glitter finish."

This metallic silver eyeliner is so pretty.I think it's great to line the lower lash line. It will definitely make your eyes pop and shine through. lol I never thought I would go for such a metallic and shiny liner, but it really is pretty to look at! I'll have to find more ways to use it. :) After reading the description, I do have to wonder about using it as an eyeshadow base too now. I'll be testing this more, for sure. It glided pretty well on my hand and then on my eyes. I'd say it is pretty soft and creamy like they state. The only part I hate is that I'll have to sharpen it! lol

The image below shows the eyeliner as well as the lip crayon.

The November 2013 Glam Bag Look


 I used all the products that came in my bag, plus my LA Colors palette in Cafe Au Lait and my Revlon Luxurious Color Smoky Crayon eyeliner. :) Thanks for sticking around! Check out Ipsy and all the brands from this month's bag!


Sunday, November 10, 2013

NYC Big Bold Gloss Review

I got this NYC Big Bold Gloss gloss from my Varsity Vox Box from Influenster! It is supposed to be a plumping gloss and it is in the shade Pleasantly Plump Pink. You get 0.39 oz of gloss for $3.99. After reading up on it, I discovered that there are quite a few shades (12 of them I think). This shade is a light pink that goes with anything. :)


When you unscrew the cap, the first thing you will notice is that the applicator is huge. lol It seems at about 3 times the size of the average doe foot applicator. You get your lips glossed in one stroke! Also, the gloss comes out rather goopy. I always open it slowly and then take some off the applicator by rubbing it on the side. Once you actually apply the gloss, you should find that it isn't sticky and goopy on your lips. It goes on thinner than expected. I was surprised by that! It actually felt quite nice especially compared to the e.l.f glosses that can be horribly sticky. Since the gloss is supposed to be plumping, it will make your lips tingle a little after a few seconds.


The color actually has a little pigment to it, which is nice too. After looking up the other shades, they all seem to actually give off some color. There is fine glitter which adds some nice shimmer, but it doesn't seem to be super shiny... or very plumping, to be honest. It does give the pouty lip effect, but I don't see big results. The smell and flavor seem to be similar to vanilla, but I can't say it it particularly good smelling. lol

Here is the gloss on my previously bare lips.


On left is my lips with a hot pink lipstick on and no gloss, and on the right is the same lipstick after I added the gloss.


I wouldn't say they are the best out there, but they aren't terrible either. It's a lot of gloss or the money and I still like the way it looks and feels on my lips. :) I keep it in my purse all the time.The lasting power is actually pretty good as well. I don't need to reapply it every 5 minutes, which is how I feel with a lot of cheaper glosses. lol

Wednesday, November 6, 2013

Kiss Nail Dress: Apply & Review

I received this package of Kiss Nail Dress nail stickers in my Varsity Vox Box from Influenster! I thought I would do a quick review on them since I tried them out today. :) You get 28 stickers in each package. It also says that there are 14 different sizes so they fit all nails. You also get a small nail file and booklet telling more about the designs and how to use the stickers. The design I got includes pink with black dots and then black with pink dots. They have shiny little round "stones" on the bottoms too. These can be used on finger nails and toe nails. Price wise, I think they range from $6.99 to $10.99 depending on where you re buying them from.


These nails aren't really like the Sally Hansen ones that I have tried before. These nails are thicker and not really foil like as are the Sally Hansen ones, which are real nail polish. I'm not sure what these ones are made of. They aren't hard to peel off the plastic sheets at all. After finding one that fit my nail, I had to try to place it properly and smooth it out as flat as possible. Some nails were harder than others to smooth out and align properly. This kind of thing takes patience. lol Once you have the sticker laid down as neatly as possible, it's time to file the excess off. Bend the sticker over the end of your nail like I am showing in this photo.


I used the rougher side (blue) of the file in quick little motions straight across the tip of my nail. I think that if I would have moved in the up to down motion, I would have ended up peeling some of the sticker off. This method worked for me and the tips of my nails stayed neat and covered by the sticker still. Then I used the less rough side (pink) to smooth out the tip of my nail again and get other little pieces of sticker left overs off. This part was quicker and easier than actually applying the sticker for me! lol


I still had some places on the edges of some nails that weren't covered by the sticker. I'm sure to avoid this I could have gone a size up and cut them to fit, but I was too lazy! lol Feel free to try it though! :) There were also a few nails with little ripples on the tips. Some came out after I gently used a nail on the other hand to pull upwards and get the little air bubbles out. Others were little creases that I couldn't remove. These little nicks only bug me at a very close inspection though. The nails overall look really cute and neat.


 As for the little booklet inside, it goes over the directions once more and also shows more of the available sticker designs. On the back, it shows that you can cut the stickers and make your own custom designs. What a great idea! I might have to try this with the left over stickers from this package.

Here is one hand finished! I like how they came out and I am interested in trying these again. The package says they last up to 10 days and you just have to peel them off when you want to remove them. After washing some dishes and a shower within 24 hours, they were still stuck on really good. After 4 days, the tips really started to wear down and I began to peel some off. They come off rather easily, but some left a little sticky residue. Nothing some polish remover can't fix. I was using my hands pretty often... always typing, feeding my many rabbits and cleaning my mess of a room. lol So with lighter use, I am sure they would last a little longer. I would still recommend these for others to try. They are pretty fun! I also recommend trying out the Sally Hansen ones. They look great and last a long time. :)