Sunday, December 29, 2013

Nov/Dec - What I Read


I didn't read much these last two months, so I thought I would just make one post for them. :)
There are links to Good Reads so you can learn more about the books and see reviews!

I don't think I've ever read a book quite like this.... but I finished it in a few days. Bitter Melon is about Frances, a Chinease-American high school student that lives in San Francisco. Her mother is forever telling her that she must be obedient to her and get straight A's, go to a certain college and become a doctor. There is no time for fun. Her mother seems almost insane the way she tries to control everything that Frances does. One day, Frances starts to question this way of life and she starts to consider her own feelings. I really enjoyed the book and it was a great, quick read for me. :)

I haven't touched a new vampire story in a while. I don't think it's everyone's cup of tea though, but I quite liked this one and it didn't end at all like I thought. Bloodline is set up as journal entries. The main characters are John Shaw, who is a young Lieutenant in World War I and Mary Seward, the young nurse who cares for him when he is brought into the hospital. So as the story begins, John is having terrible nightmares about his commander (Quincey Harker) that are gruesome and seem impossible. He blames them on "trench fever". Sure, the man is fierce, a bit cruel and a little strange... but... a blood sucking demon? Eh? Soon, Harker comes to town in hopes to woo John's younger sister, Lily. That's when John realizes he needs to face the facts and try to figure out what is really going on. As the story unfolds, John discovers that Harker is trying to preserve Dracula's bloodline... uh oh! So John and Mary go off in hopes to stop Harker from marrying Lily and preserving the bloodline. There's many more little twists in there... some that surprisingly caught me off guard. lol I'll admit that some parts were a tiny bit cheesy, but I don't mind. I love a bit of history and a dash of blood sucking demons.


This book is by psychoacoustic expert Joshua Leeds and veterinary neurologist Susan Wagner. The idea that sound effects us isn't new by any means, but this book is meant to show that sound can be turned into a tool to overcome separation anxiety, thunderstorm panic, and other behavior challenges in dogs. It even comes with a CD with the music they talk about throughout the book. They have a website where you can find other books for more specific challenges and even one for cats! There are also free, short music downloads. The books talks about the research they've done and personal experiences where they have used certain music to improve the lives of animals. They say surrounding your canine with great sounds can help them live longer, happier and healthier lives. I play the music to wind the dogs down and to help soothe my very anxious cat. They all scoot closer to the sounds and usually fall asleep. So peaceful.


As this one is in a series, it's harder to talk about. You'd have to read the first two books in the Caster Chronicles, which are Beautiful Creatures and Beautiful Darkness! :) I actually picked this one up months ago, got into the first few chapters, became bored and put it down. After I picked it up again, I got through it much easier. It is a bit slow at some points, a little warning there. I've been in love with Ethan Wate since the beginning. He is a sweet little southern gentleman with a bit of sass. Lots of characters in this book. Lots of them from the previous books, but you get to know them much better. I liked that about this book. The end of this book kind of broke my little heart, but I have hopes that it will be coddled and bandaged in the next. I had a feeling what came was coming, but it still hurt nonetheless. lol


Friday, December 27, 2013

First Trip to Ulta!

I recieved a giftcard for Ulta this Christmas! It was just set up here this summer. The funny/sad part is that I spent it on "drugstore" brand makeup! I thought to myself, "Do I spend all $40 on one makeup palette? Or do I buy a few things that I know I need?"

 Knowing that I had absolutely no money at the moment to take my booty over to Walmart, I decided to spend this "free" money on some things I knew I needed right now. It's hard for me to justify spending so much on a eyeshadow palette or something, when I know I can find a product just as good or sometimes better for half the price or cheaper. I couldn't let myself do it! lol I did enjoy checking out the store though! It was like a fantastic dream! They are always having sales and sending out coupons in their ads that come in the newspaper... I'm sure I will be back soon. There is a few dollars left on my card! ;) 

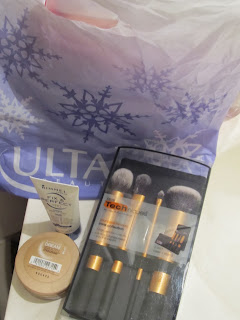
Here are the three things that I picked up while exploring the store. I'll probably be back to give better reviews after using everything. :)

1. Real Techniques: Core Collection Brush Set - $17.99

Check them out, here!

Great looks start with a flawless base. Create a perfect canvas with this collection of coverage essentials by Real Techniques.
  • Includes 4 full-size brushes + case:
  • Detailer brush: precision cut to effortlessly conceal problem areas; or, use with lipstick for long-lasting shape and definition
  • Pointed foundation brush: use with liquid foundation to build custom coverage
  • Buffing brush: ideal for full coverage application of powder and mineral foundation
  • Contour brush: delicately applies highlighter to contour or create sheer, soft-focus finish
  • Panoramic brush case is a 2-in-1 case + stand
  • Look pixel-perfect even in harsh light
  • Ultra-plush, synthetic taklon bristles are hand-cut and 100% cruelty-free
  • Extended aluminum handles are light and easy to use

2. Rimmel London: Fix & Perfect Pro Primer - $7.99

Check it out, here!

Skin perfecting primer for 5-in-1 results: smoothes, resurfaces, brightens, matifies and protects. Prolongs foundation wear.
  • Foundation glides on more smoothly, more evenly and wears longer. Or wear alone for an all-day fresh and even complexion.
  • Smoothes to minimize pores
  • Resurfaces for an even complexion
  • Brightens skin all day
  • Mattifies and eliminates shine
  • Protects skin from environmental aggressors

3. Maybelline: Dream Smooth Mousse - $8.99

Check it out, here!

Revolutionary whipped formula provides an air-soft, perfect matte finish coverage, with a weightless feel. Color pigments offer superior coverage. Blends effortlessly for a soft, natural-looking, even-toned result.
  • Unique cream-whipped foundation provides 100% baby-smooth perfection
  • Skin looks and feels hydrated for 14 hours – never rough or dry
  • Ideal for normal to dry skin types
  • Oil-free, fragrance-free, Dermatologist-tested, allergy-tested, non-comedogenic – won’t clog pores, safe for sensitive skin

Wednesday, December 25, 2013

Christmas 2013

Christmas was celebrated early this year so that the whole family could get together. We had tons of good food and opened presents on the 21st. It was fun and chaotic as usual! Soon after celebrating though, a 24 hour bug swept through most of the family! We were all sick and totally miserable. Thankfully we were back to normal by the next day... and able to eat other foods besides dry toast and crackers! lol On a much brighter note, I got lots of great stuff for Christmas this year. Thank you, dear family! Take a look at some of my favorites here! Also, enjoy bits and pieces of the dogs who decided to be in the way of photos too... mostly Ginger's limbs. ;)
This huge tote is handmade from a rabbit food bag! The inside has a really cute rabbit print material. It's incredibly cool and I can't wait to bring it to a rabbit show and...well, show it off!

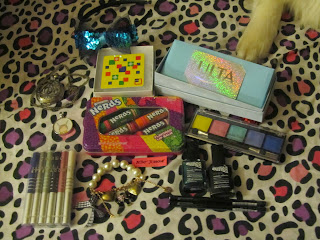
So, I finally get to visit our new Ulta store with this gift card! I also got a gift card for JC Penney and a local pet store. Of course there are some various beauty items here too! I got some eye shadows and lip balms, some neat Avon mosaic nail polishes and my favorite glimmer sticks eyeliners. I also received a few pieces of jewelry and a sparkly bow headband.

My new and ever glorious Mukluks! My mother knows me so well... feathers, tribal pattern, bright neon-like colors. These are the Jasmine Boot Slippers,and they are super cozy and cute!

I am totally digging the Red Wings hat and scarf! Look at that pompom!

 Loki likes to bobble! My stuffy Captain America needed a friend... or enemy...
This adorable little Pop! vinyl Loki bobble head figure just makes me so happy... and look how much bigger he is than Thor. I bet that makes him ecstatic. ;)

I hope you've had a very merry Christmas and best wishes to you in the new year!

Tuesday, December 24, 2013

Bobbi Brown Makeup Manual - Book Review

Bobbi Brown Makeup Manual - Retails for $32
Bobbi's 25+ years of makeup artist experience is distilled into one volume that includes over 200 full-color photos and step-by-step instructions as well as a "Ten Step Guide to Perfect Makeup" that teaches you how to apply your makeup in ten minutes or less. Packed with all the tricks of the trade, this book also offers a unique guide for aspiring makeup artists: how to break into the business, put together a portfolio, book work, and work with photographers, magazine editors, fashion designers, & celebrities. (Hardcover, 221 pg.)

I've seen this book all over the internet during my searches for makeup tutorials and all that. While I was at the library I spotted it on a shelf! I don't know why I never thought to look there! So this post is all about what I think of this book. If you would like to buy it, check out Bobbi Brown's online store, or look on sites like Amazon and Ebay to scope out a good deal! This book could make a good gift for a makeup lover in your life. The book is broken down into two sections, "Basics" and "Artistry". There are 12 total chapters that cover everything from basic equipment to giving advice on how to perhaps start a career as a makeup artist. The claim is that this book is "for everyone from beginner to pro". Let's see if that's true!

In the beginning it starts by going over some of the basic brushes and their uses and then how to care for and clean them. There is also a helpful section on taking care of your skin and making it the best it can be. Then it goes on to the makeup application. It starts off by explaining the steps to prepare your face for makeup and then choosing foundations and concealers. There are also some tips and tricks for certain skin conditions like blemishes, hyperpigmentation and rosacea. It also exlains powders, bronzers and blush. Then lastly, lips and eyes! In the eye chapter it explains how to create a basic eye look as well as taking care of those rascally eyebrows. There are also parts about eyeliner, mascara and false lashes.The book goes over the different formulas you can find of each kind of makeup product too. The first section ends by showing a "10 step guide to perfect makeup" and then something called "special makeup applications", which talks about bridal makeup, skin tones, teens and older skin.

In the second part of the book, it's geared more towards advice on how to become a professional and breaking into the business. There are a list of career options and descriptions as well as information on how you can create a portfolio. There is a great section on what you should have in a professional makeup kit. It then mentions how you should go about doing makeup to look good for photography, television, fashion shows and magazines. It ends with a cool history of makeup timeline and short bios on well known makeup artists.

My Final Thoughts...

In conclusion, I don't think this book would be too beneficial to a pro. They probably know everything or most of the information in the book already. There were some things I felt that needed more explanation and perhaps more diagrams to better illustrate things. The photos are great! I feel like I can actually pick up and take things out of the book. There are some great tips and tricks throughout this book. I learned quite a bit about how to take better care of my skin and how to prep it for better makeup application. I think this book would be great for a beginner or intermediate makeup user. Overall, I think it was a good book and I enjoyed the read. :)

Photos of Some Pages

My pictures are terrible and do the pages no justice! lol 


Thursday, December 19, 2013

Influenster Jolly VoxBox 2013

Please ignore my extreme dorkyness. lol Enjoy looking into my Jolly VoxBox!


ALL PRODUCTS COMPLIMENTARY FOR TESTING PURPOSES FROM INFLUENSTER!

Puffs Ultra Soft & Strong To Go Tissue Pack: $0.49/single pack Puffs Ultra Soft & Strong To Go is still our best non-lotion facia tissue to use in the car, for on-the-go, wherever you go!

NYC New York Color HD Color Trio Eye Shadow: $2.99 HD Color Trio Eye Shadow delivers high intensity color with a silky soft texture. This lightweight formula blends effortlessly for the ultimate smoky eye look.

Rimmel London Show Off Lip Lacquer: $5.49 - $5.99 It's the end of color as you know it! The intense rich colour of a lipstick combined with an invincibly smooth lacquer shine. Available in 14 shades.

Skinny Cow Candy:
$3.99/box, $1.09 single bar or pouch TA DA! Presenting almost too good to be true Skinny Cow Candy!Unbelievably chocolately. Melt-in-your-mouth madness. Perfectly yummy portions. Skinny Cow's line of candy weighs in at 110 to 130 calories. So if you've been avoiding the candy aisle, welcome back. You're gonna feel like a kid in a candy store.

Ducklings Mini Rolls: $2.00 - $3.00 Excellent for repair, crafting, and imaginative projects. High performance strength and adhesion characteristics. Tears easily by hand without curling and conforms to uneven surfaces. Ducklings are perfect for small repairs, trimming out projects or for when you just need a little tape!

Friday, December 13, 2013

Awaiting my Jolly VoxBox!

I just got the email saying that my Jolly VoxBox from Influenster will be sent out soon! There is a "cheat sheet" up, so I already get to see what I'll be getting! I can't wait!

  • Rimmel London Show Off Lip Lacquer
  • NYC New York Color HD Color Trio Eye Shadow
  • Ducklings™ Mini Rolls ( made by Duck Tape)
  • Puffs® To Go
  • Skinny Cow Candy
 

I hope everyone is getting their holiday shopping done... I haven't! lol I can't believe there is only 12 more days until Christmas... then soon the new year! It's crazy how time just seems to fly by. I will return with the opening of my VoxBox after it arrives! See you soon! :)


Monday, December 9, 2013

Our New Family Member: Meet Ginger!

I recently welcomed a 3rd dog to my animal family. :) She is an Australian Shepherd that I've named Ginger! Her nicknames so far include: Ginny, Gin, Gingy, and Gingeroo. lol She is a big ball of energy! She is currently 6 months old, 36 pounds and 18 inches tall. We've had her a little over a week and she now knows a few commands. I have been taking her on walks with my two Miniature Aussies, Tuli and Jaa, which she is slowly getting used too. She is also learning how to play with various toys to entertain herself. It's always a fun challenge to train dogs! In the summer time I hope to have the basic obedience skills down and then I'll start her on some backyard agility.


Thursday, December 5, 2013

Staying Organized: Bathroom Edition

I love to organize things! I am big on finding storage containers and organizing things by size/shape or type of item. I have so much make up, hair accessories, jewelry and nail products that it's easy to clutter up my small bathroom. I made my dad install a large shelf to hang over the toilet so that I could put things away! You will soon see why I definitely needed it! Keeping things organized makes getting ready to face the day much easier. Perhaps this post will give you some ideas on how you can keep your bathroom a little more organized! While you are out holiday shopping, keep an eye out for neat ways to organize the spaces in your house. :)

Figure one. The life saving cabinet. As you can see, it's pretty full! Before this bad boy was attached to the wall, most of this stuff was shoved into a drawer in my vanity! It was nearly impossible to find anything and it looked terrible. We purchased this at Home Depot. I want to say this one was around $100. We had the option of some cheaper ones, but this one matched the new vanity we had installed a year prior. There were a few options between $60 and $80 too. To better organize some of the things inside, I have a little white plastic container bought from Dollar Tree. I also have some pop-up paper organizers that I bought very cheap on Ebay. I believe they came from Korea. I am looking for a better method now though! My lip products and mascara and eyeliner collections have tripled in size since I bought them. They are bursting at the seams. lol So, in this cabinet we have some various things at the top. It's kind of the miscellaneous shelf. There are cotton balls and makeup sponges, my collection of face masks, my moisturizers and lotions, nail polish remover and my makeup remover wipes. In the middle shelf, I have some bigger eyeshadow palettes and the plastic container is full of smaller palletes that I don't use as often. I'll get to where I put the other ones soon. ;) There are also a few single shadows there as well. In the bottom shelf that is left exposed after the doors are closed, I have my small fragrance collection, my eyeliners and mascaras in the first paper organizer and then my lipsticks and glosses in the second one. On the far right there are some things that don't fit anywhere either. Some lip products, a couple powders and false lashes.

Moving down and onto the vanity, I have this little organizer with drawers. I stole it from the craft room! It used to have pens and markers inside. I thought it was better suited to hold my makeup. lol After this picture was taken I added a few more things, but I'll explain. :) At the top I have my primers, concealers and my go to eyeliner pencil. I also have a foundation and BB cream there. My eyelash curler is always on the far right and and ready to go too! In the area under the pop up lid, I put the powders I use most often. There is also a tiny blush there now. The first drawer is where I keep all of my brushes! In the second drawer I have all of the small eyeshadow palettes that I use most often. There are 6 small palettes inside there at the moment... I was surprised how much I could fit into this little drawer! In the last drawer I have my collection of cream shadow pencils and pots. After the picture was taken, I added 3 different bronzers on one side. They still all fit in there rather nicely. We are just going to ignore the bracelet and the triple antibiotic cream I left on top. That is no way to stay organized! I love this little drawer container because it fit perfectly on the edge of the vanity. It's right there when I need everything. Very little hassle when I am looking for things.

Over to the medicine cabinet! I don't own very many hair styling products or meds... or else there might be more to look at. lol At the bottom I have my hairspray, mousse, pot of q-tips and the mouth wash has been swapped out for a dry shampoo. The next one up has a random collection of things, like an anti-frizz hair cream, band-aids, and floss! Up top is an old kabuki and powder foundation that don't have a place among my other makeup. lol On the knob, I hang some necklaces and headbands that I don't want to get tangled up in where they usually are stored. This is probably the least interesting part of my bathroom... This area doesn't seem to have any sort of direction.

On the back of my door is this neat jewelry organizer that I bought for $8 at Big Lots. It has 12 small open pockets at the top and 3 long zipper pockets at the bottom. This is where I put most of my "costume" jewelry. If I didn't have this... I have no idea where all of this would be right now. It scares me to think about it!! I store many different bracelets and rings in the top pockets and then long necklaces in the bottom ones. I also hang some of my sunglasses off the top. They are much better protected here. I've had the dogs eat them before. lol

This little earring tree is now located safely on top of the dresser in my closet. I can't tell you how many times it has been knocked over onto the floor or into the sink. If only I had more space on my vanity. At least the poor thing is safe now! I really do enjoy it though. It keeps all my earrings in clear view. I also like that I can put things in the little dish at the base of the tree. My mom bought this for me as a gift for Christmas a few years back. I believe it was around $10 at Family Dollar. :)

Top drawer of the vanity! This is where all of my hair accessories live. There are two more of the plastic Dollar Tree containers in here. I have hair ties in the bottom one and then some of my hair clips/barrettes in the top one. The rest of the space is occupied by my many headbands and hair bows! This drawer can be hard to keep organized. The headbands can be a pain! I'm not sure I have any other way to store them at the moment, but Pinterest is always full of creative ideas.

The bottom vanity drawer is where all of my nail products go. Two more Dollar Tree plastic containers hold my mini and standard sized polishes, as well as my detail brushes and other little nail accessories. My clippers, files and all that jazz are here too. :) Right now I have so many polishes that they don't fit inside the container anymore. Something else I have to work on... bigger container! lol I like just pulling them right out of the drawer and sorting through to pick my colors. I can bring them up onto the counter and see them better in the light. Plus I won't have to be hurting my back by bending over and trying to dig into the drawer.

Last, but not least... under the sink. I have a huge makeup palette, travel makeup bags, bath stuff, a nail dryer, hair dryer, flat iron... all the big stuff I don't want to look at on a daily basis! There isn't a whole lot of room, so I added a little basket at the bottom to better organize the small things. I have some bath salts, spare razors and similar things there. The bigger things are stacked as nicely as possible. My hair styling tools are located in the back right corner. There is a taller cube container from the Dollar Tree that they sit inside of. That keep the cords from getting tangled and them from getting lost in there!

Well, I hope that this might have given you an idea or two on how you can make a small space hold a lot more stuff than it is supposed to. ;) So far, this system is working quite nicely for me. Someday soon I will have to revamp the shelf where my lip products and mascaras are... they are slowly taking over! I'll be on the look out for more cheap containers! I always check at places like Dollar Tree, Dollar General, Family Dollar and Big Lots. I can usually find the best deals there. If not those places, Walmart or Meijer will be there to back me up. I also like to shop around and then look for deals on Ebay. That can sometimes be your best bet. :) Take care and enjoy your holiday shopping! I hope everyone had a blessed Thanksgiving!

Wednesday, November 27, 2013

DIY Christmas Advent Calendar

This year for Christmas I decided to do something really fun for my 6 year old niece! I am usually pretty broke, but just like her birthday, I wanted to leave her with that lasting impression of, "Wow, I have the best aunt"! Hahaha! I shop at Dollar Tree, where everything is $1...or sometimes two for $1! For her birthday I filled a gift bag for only $12. She got 12 different things and her smile got bigger and her voice more excited as the gifts kept coming out of the bag. It was like she was a young Mary Poppins. I wanted to do something similar for Christmas! What better way than an advent calendar? She gets 25+ gifts! I shopped at Dollar Tree and only spent $10 on her gifts. I collected toilet paper and paper towels rolls from our home and my sisters to hold the gifts. I used left over tissue paper, scrapbook paper and the various glues we had lying around. I just so happened to have an old box from a previous gift I had received to be the backing. So I really only spent the $10 on her gifts. :)


I managed to get Christmas puppy and kitten stickers (which I cut out separately so they fit), plastic rings, clay ornaments, Starburst, girly erasers, hair ties, a Doc McStuffins washcloth, a windup walking penguin, a package of temporary tattoos, and then added my diy lip balms and a homemade bracelet.

First I collected the paper rolls! I suggest bringing one to the store with you to make sure the gifts fit inside! I forgot to, but still did pretty good! I didn't have enough, so I cut  few to make them shorter. My tree is set up to where the numbers are in a random order. I just made sure that smaller gifts went in the shorter tubes! Other materials I used where Christmas scrapbook paper (to wrap the tubes, used 6 different mostly green patterns), scissors, a pen, yellow card stock (for the star topper), tissue paper (to cover the end of the tubes), a hot glue gun (to glue tubes together),  an extra strength glue stick (to put paper on the tubes), and regular white glue (to secure the tissue paper).

So I cut the scrapbook paper into fourths. Then I covered each piece in the extra strength glue stick and rolled it onto the paper roll. This was the longest step! It took me about an hour. lol You can also just use paint or leave them plain though. After the roll was wrapped, I cut off the excess paper on the ends.


 After all the tubes were wrapped, I started cutting out squares of tissue paper and then adding the numbers to them. At this point I realized that one item did not fit in the tubes! So I left out a number and wrapped the little gift separately so it looked like a gift under the tree. :) To secure the tissue paper to the ends of the tubes, I used a little bit of the regular white glue around the edges of one end and lightly pressed the tissue paper to the glue. I tried my best to keep the numbers centered.

 Once all the tubes were covered, I used the hot glue gun to glue the bottoms/sides together in a Christmas tree shape! When turned around, I could see the numbers through the tissue paper. That made it easier to spread out the gifts evenly so she wouldn't be getting too many of the same kind of gift really close together.

 I stuffed everything in the back and then carefully adhered it to a big box (one side cut off) that I had lying around that another gift came in. lol This way nothing could fall out! I also have seen people just trace and cut a piece of cardboard to fit the back or use felt. :) I glued a cut out star above the tree and then wrote Merry Christmas and decorated with more drawn starts. I taped the separately wrapped washcloth to the base of the box to look like a present under the tree. This tree took me about 3 hours to complete!

 I pinned lots of ideas on Pinterest!
Here are some other cool ideas that I found that also helped to inspire me when I planned on this project!

[3] Grains of Earth (this one has several great projects!)